Introduction to ABACUS: Path to PW calculation - Part 1
作者:黄一珂,邮箱:huangyk@aisi.ac.cn
审核:陈默涵,邮箱:mohanchen@pku.edu.cn
飞书链接:Introduction to ABACUS: Path to PW calculation - Part 1
💡写在前面 作为 SIAB(Systematically Improvable Atomic orbital Basis, link)数值原子轨道生成程序的数据上游,本系列文档将首先从平面波基组/SCF(Self-Consistent Field,即自洽场迭代)讲起,将《从 SIAB 到 ABACUS》的讲述延续下去,之后再探索 SIAB 的下游,即涉及 NAOs 的 LCAO method(basis_type = 'lcao')。 本系列文档的预期受众:新晋 ABACUS 开发者
🎨写在前面 实际上,在 2023 Q1(第一季度),ABACUS 发布了面向团队内部的代码编程规范,因此在代码阅读过程中可能遇到各种还没有被更正的变量命名,请格外注意。代码的缩进与其他格式则由 2023.5 发布的新 Pull request 标准,采用clang-format-16标准执行。
📃写在前面 本系列文档内容的组织原则为:
- 不脱离代码——避免读者看完手册后对代码没有一丁点概念
- 不堆砌代码解释——避免平庸的代码解释,努力兼顾拉近读者和代码距离的同时,做到提纲挈领,不逐行复制代码后进行停留在代码语义上的解释
首先通过位于根目录下的 main.cpp 进入程序:
int main(int argc, char **argv)
{
    ModuleIO::parse_args(argc,argv);
    Parallel_Global::read_mpi_parameters(argc,argv);

    Driver DD;
    DD.init(); // <- start!
Driver
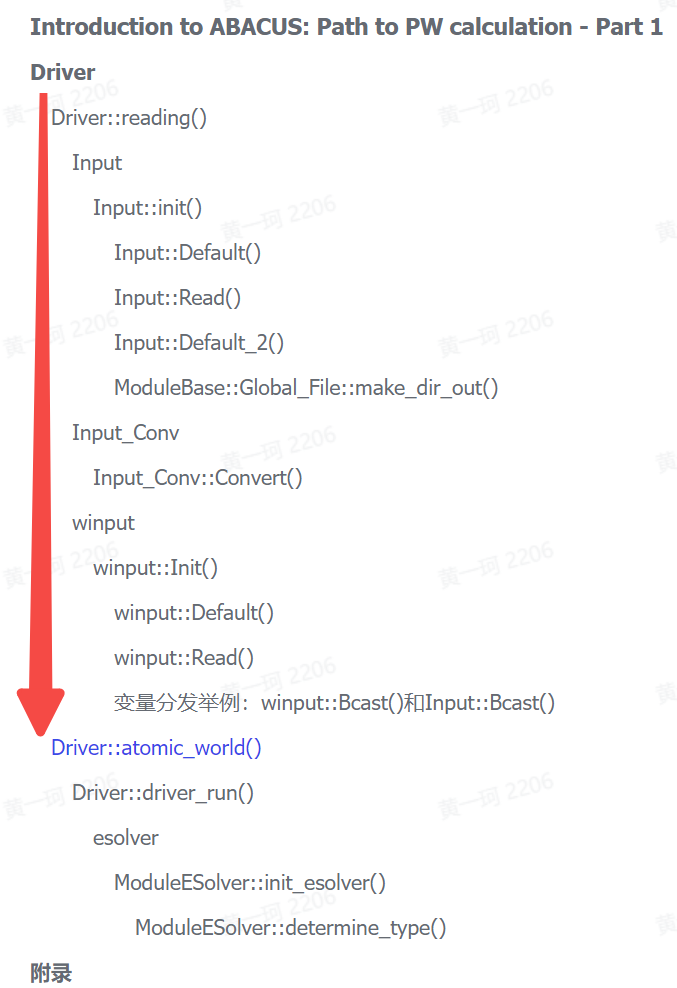
在本文档中,我们跳过所有关于记录时间的函数,只关心最主要的部分。在 main.cpp 中定义的 Driver 类对象 DD,其类成员函数 Driver::init() 在根目录 driver.cpp 下被定义:
void Driver::init()
{
    this->reading();
    this->atomic_world();
    INPUT.close_log();
}
Driver::reading()
首先从 Driver::init() 来到其所调用第一个函数 Driver::reading():
void Driver::reading(void)
{
    INPUT.Init(GlobalV::global_in_card);
....
}
Input
便发现 Driver 类可能有数据成员 INPUT,查看头文件 driver.h,并没有关于 Input INPUT 的声明,并且 Driver 类实际上并无任何数据成员,因此需要从 #include 中寻找:
#include "driver.h"

#include "module_io/input.h"
#include "module_io/input_conv.h"
#include "module_hamilt_pw/hamilt_pwdft/global.h"
#include "module_base/memory.h"
#include "module_base/timer.h"
#include "module_esolver/esolver.h"
#include "module_io/cal_test.h"
#include "module_io/print_info.h"
#include "module_io/winput.h"
追踪到 input.h,发现外部变量声明:
extern Input INPUT;
在 input.cpp 中则有 Input INPUT; 这一 INPUT 的变量定义。类似地,我们在更多的被 include 文件中寻找 extern 变量,这些变量都会在程序运行一开始被定义,直到程序结束时才会销毁:
// module_hamilt_pw/hamilt_pwdft/global.h
namespace GlobalC
{
// line 284
    extern pseudopot_cell_vnl ppcell;
// line 292
    extern UnitCell ucell;
    extern Parallel_Grid Pgrid;
    extern Parallel_Kpoints Pkpoints;
    extern Restart restart; // Peize Lin add 2020.04.04
即是说例如对于 UnitCell ucell,其数据成员全部会在程序运行一开始被创建。
Input::init()
Driver 首先调用的 INPUT 的成员函数 Input::Init()(ABACUS 中很多类都具有 init() 函数,但存在函数名无法体现其功能的问题,可能会在后续工作中修改),该成员函数定义在 source/module_io/input.cpp,同时也发现了 Input INPUT 的定义:
//source/module_io/input.cpp
Input INPUT;

void Input::Init(const std::string &fn)
{
    this->Default();
    bool success = this->Read(fn);
    this->Default_2();

#ifdef __MPI
    Parallel_Common::bcast_bool(input_error);
    Parallel_Common::bcast_bool(success);
    Bcast();
#endif
    bool out_dir = false;
    if(!out_app_flag && (out_mat_hs2 || out_mat_r || out_mat_t || out_mat_dh)) out_dir = true;
    ModuleBase::Global_File::make_dir_out(this->suffix, this->calculation, out_dir, GlobalV::MY_RANK, this->mdp.md_restart, this->out_alllog);
    Check();
}
Input::init() 唯一参数为 fn,实际被传入参数 GlobalV::global_in_card(这里 GlobalV 代表 Global Variables,是全局变量的意思,一般用全大写的变量名,C++ 区分字母大小写,Fortran 不区分)。这一参数在 module_base/global_variable.cpp 中被定义,类似的文件还有 stru_file 和 global_kpoint_card:
//source/module_base/global_variable.cpp
std::string global_in_card = "INPUT";
std::string stru_file = "STRU";
std::string global_kpoint_card = "KPT";
因此 Input::init() 函数实际上将要打开 INPUT 文件。
Input::Default()
Input::init() 调用 Input::Default() 函数,
//source/module_io/input.cpp
void Input::Init(const std::string &fn)
{
    this->Default(); // <- we are here now
    bool success = this->Read(fn);
    this->Default_2();
    ....
其定义为:
//source/module_io/input.cpp
void Input::Default(void)
{
    suffix = "ABACUS";
    stru_file = ""; // xiaohui modify 2015-02-01
    kpoint_file = ""; // xiaohui modify 2015-02-01
    pseudo_dir = "";
    orbital_dir = ""; // liuyu add 2021-08-14
    read_file_dir = "auto";
    wannier_card = "none";
    latname = "none";
    calculation = "scf";
    esolver_type = "ksdft";
    pseudo_rcut = 15.0; // qianrui add this parameter 2021-5
    pseudo_mesh = false; // qianrui add this pararmeter
    ntype = 0;
    ...
即 Input::Default() 函数为所有变量赋默认值。当前所展示的这些变量实际上均为 Input 类的数据成员,而非 GlobalV 等全局类。全局类的存在是为了避免出现巨大的形参表。在 Input::Default() 之后,调用 Input::Read() 函数读取 INPUT 文件,并确定是否读取成功。
Input::Read()
//source/module_io/input.cpp
void Input::Init(const std::string &fn)
{
    this->Default();
    bool success = this->Read(fn); // <- we are here now
    this->Default_2();
    ....
Input::Read() 函数:
//source/module_io/input.cpp
bool Input::Read(const std::string &fn)
{
....
    std::ifstream ifs(fn.c_str(), std::ios::in);
    ifs.clear(); ifs.seekg(0);

    char word[80]; char word1[80];
....
    while (ifs.good())
    {
        ifs >> word1;
        if (ifs.eof()) break;
        strtolower(word1, word);

        if (strcmp("suffix", word) == 0)  read_value(ifs, suffix);
        else if (strcmp("stru_file", word) == 0) read_value(ifs, stru_file);
        ...
🔧重构思考
Input::read()函数的功能为读取INPUT文件(创建ifstream类对象ifs),之后使用对 N 行参数定义,使用最多 N 次 if 判断strcmp的方法进行参数读取,若参数读取成功,被传递给Input类的数据成员(覆盖)。
由于我们现在考察针对 PW(Plane Wave,平面波)的相关功能,因此额外注意包含 pw 的相关字段:
bool Input::Read(const std::string &fn)
{
....
    if (basis_type == "pw" && gamma_only != 0) // pengfei Li add 2015-1-31
    {
        gamma_only = 0;
        GlobalV::ofs_running << " WARNING : gamma_only has not been implemented for pw yet" << std::endl;
        GlobalV::ofs_running << " the INPUT parameter gamma_only has been reset to 0" << std::endl;
        GlobalV::ofs_running << " and a new KPT is generated with gamma point as the only k point" << std::endl;

        GlobalV::ofs_warning << " Auto generating k-points file: " << GlobalV::global_kpoint_card << std::endl;
        std::ofstream ofs(GlobalV::global_kpoint_card.c_str());
        ofs << "K_POINTS" << std::endl;
        ofs << "0" << std::endl;
        ofs << "Gamma" << std::endl;
        ofs << "1 1 1 0 0 0" << std::endl;
        ofs.close();
    }
这里 "gamma_only" 不为 0,是因为目前 ABACUS 不支持只计算单个布里渊区 k=(0,0,0)(通常称为 Gamma 点)的算法,只用 Gamma 点的算法可以把平面波基矢量减少一半,但目前 ABACUS 还不支持。
Input::Default_2()
//source/module_io/input.cpp
void Input::Init(const std::string &fn)
{
    this->Default();
    bool success = this->Read(fn);
    this->Default_2(); // <- we are here now
    ....
接下来 Input 类成员调用其 Input::Default_2() 方法:
//source/module_io/input.cpp
void Input::Default_2(void) // jiyy add 2019-08-04
{
    if (GlobalV::MY_RANK != 0) return;
    if (vdw_s6 == "default")
    {
        if (vdw_method == "d2") vdw_s6 = "0.75";
        else if (vdw_method == "d3_0" || vdw_method == "d3_bj") vdw_s6 = "1.0";
    }
    if (vdw_s8 == "default")
    {
        if (vdw_method == "d3_0") vdw_s8 = "0.722";
        else if (vdw_method == "d3_bj") vdw_s8 = "0.7875";
    }
    ...
    if (calculation == "scf")
    {
        if (mem_saver == 1)
        {
            mem_saver = 0;
            ModuleBase::GlobalFunc::AUTO_SET("mem_saver", "0");
        }
        this->relax_nmax = 1;
    }
    else if (calculation == "relax")
    {
        if (mem_saver == 1)
        {
            mem_saver = 0;
            ModuleBase::GlobalFunc::AUTO_SET("mem_saver", "0");
        }
        cal_force = 1;
        if (!this->relax_nmax)
            this->relax_nmax = 50;
    }
在首先设置 Default,即参数默认值后再覆盖,然后再调用 Default_2 的好处是可以再次覆盖某些参数的实际取值,并根据 case-by-case 地,调整某些值。实际上,此处暗示了一些已经成熟的参数搭配方式,即是说根据特征的任务,实际上都有其一套参数赋值方案。
void Input::Default_2(void) // jiyy add 2019-08-04
{
    ....
    if (basis_type == "pw")
    {
        if (ks_solver == "default")
        {
            ks_solver = "cg";
            ModuleBase::GlobalFunc::AUTO_SET("ks_solver", "cg");
        }
        else if (ks_solver == "cg")
        {
            GlobalV::ofs_warning << " It's ok to use cg." << std::endl;
            if (diago_proc != GlobalV::NPROC)
            {
                ModuleBase::WARNING("Input", "when CG is used for diago, diago_proc==GlobalV::NPROC");
                diago_proc = GlobalV::NPROC;
            }
        }
        else if (ks_solver == "dav") GlobalV::ofs_warning << " It's ok to use dav." << std::endl;
        bx = 1; by = 1; bz = 1;
    }
...
    if (basis_type == "pw" || basis_type == "lcao_in_pw")
    {
        if (gamma_only_local)
        {
            gamma_only_local = 0;
            ModuleBase::GlobalFunc::AUTO_SET("gamma_only_local", "0");
        }
    }
 ...
     if (scf_thr == -1.0) // default value, set in Input::Default()
    {
        if (basis_type == "lcao" || basis_type == "lcao_in_pw") scf_thr = 1.0e-7;
        else if (basis_type == "pw") scf_thr = 1.0e-9;
    }

    if (scf_thr_type == -1) // default value, set in Input::Default()
    {
        if (basis_type == "lcao" || basis_type == "lcao_in_pw") scf_thr_type = 2;
        else if (basis_type == "pw") scf_thr_type = 1;
    }
...
考虑到一般而言第一性原理软件分支功能众多,且对于 ABACUS,其功能的扩展需要入侵性修改众多代码,行数过多,易扩展性有待提高(关于程序的易扩展性设计方案,见之后单独文档)。因此以下我们首先假设情景为使用 PW 进行 SCF 计算。
ModuleBase::Global_File::make_dir_out()
//source/module_io/input.cpp
....
void Input::Init(const std::string &fn)
{
    ....
    bool out_dir = false;
    if(!out_app_flag && (out_mat_hs2 || out_mat_r || out_mat_t || out_mat_dh)) out_dir = true;
    ModuleBase::Global_File::make_dir_out(this->suffix, this->calculation, out_dir, GlobalV::MY_RANK, this->mdp.md_restart, this->out_alllog); // <- we are here now
    Check();
}
区别于之前的 Input 类中成员函数,这里突然调用的函数变成了 ModuleBase 类。这个函数的功能为读取 INPUT 文件之后,在 INPUT 中定义的 out_dir、suffix 等,在这里可以拼合成为完整路径,并使用 C++/Linux interface 来根据具体任务创建不同的具体输出路径(jump to the code):
//source/module_io/input.cpp
void ModuleBase::Global_File::make_dir_out(const std::string &suffix, const std::string &calculation, const bool &out_dir, const int rank, const bool &restart, const bool out_alllog)
{
    std::string prefix ;

#ifdef __EPM
    #ifdef __MPI
        prefix = "OUT_EPM_MPI.";
    #else
        prefix = "OUT_EPM.";
    #endif
#else
    prefix = "OUT.";
#endif

    GlobalV::global_out_dir = prefix + suffix + "/";
    GlobalV::global_stru_dir = GlobalV::global_out_dir + "STRU/";
    GlobalV::global_matrix_dir = GlobalV::global_out_dir + "matrix/";

#ifdef __MPI
    MPI_Barrier(MPI_COMM_WORLD);
#endif
    int make_dir = 0;
    std::string command0 =  "test -d " + GlobalV::global_out_dir + " || mkdir " + GlobalV::global_out_dir;

    if(calculation == "md")
    {
        int make_dir_stru = 0;
        std::string command1 =  "test -d " + GlobalV::global_stru_dir + " || mkdir " + GlobalV::global_stru_dir;
....}
    if((out_dir) && calculation == "md")
    {
        int make_dir_matrix = 0;
        std::string command1 =  "test -d " + GlobalV::global_matrix_dir + " || mkdir " + GlobalV::global_matrix_dir;
        times = 0;
....}

    std::stringstream ss,ss1;

    if(out_alllog)
    {
        ss << "running_" << calculation << "_" << rank + 1;
        open_log(GlobalV::ofs_running, ss.str(), calculation, restart);
        #if defined(__CUDA) || defined(__ROCM)
        open_log(GlobalV::ofs_device, "device" + std::to_string(rank), calculation, restart);
        #endif
    }
    else
    {
        if(rank==0)
        {
            ss << "running_" << calculation;
            open_log(GlobalV::ofs_running, ss.str(), calculation, restart);
            #if defined(__CUDA) || defined(__ROCM)
            open_log(GlobalV::ofs_device, "device", calculation, restart);
            #endif
        }
    }

    if(rank==0) open_log(GlobalV::ofs_warning, "warning", calculation, restart);

#ifdef GATHER_INFO
    open_log(GlobalV::ofs_info, "math_info_" + std::to_string(rank), calculation, restart);
#endif
}
🔧重构思考 这部分定义出了相当多的输出文件和目录,然而多个输出文件往往不利于对 ABACUS 新上手使用者,容易在繁多的文件中迷路,因此可以考虑重新设计输出信息。
最后调用 Input::check() 函数对某些参数进行核对。
Input_Conv
返回 Driver::reading(),来到 Input_Conv::Convert().
void Driver::reading(void)
{
    INPUT.Init(GlobalV::global_in_card);
    Input_Conv::Convert(); // <- now we are here
    ....
Input_Conv::Convert()
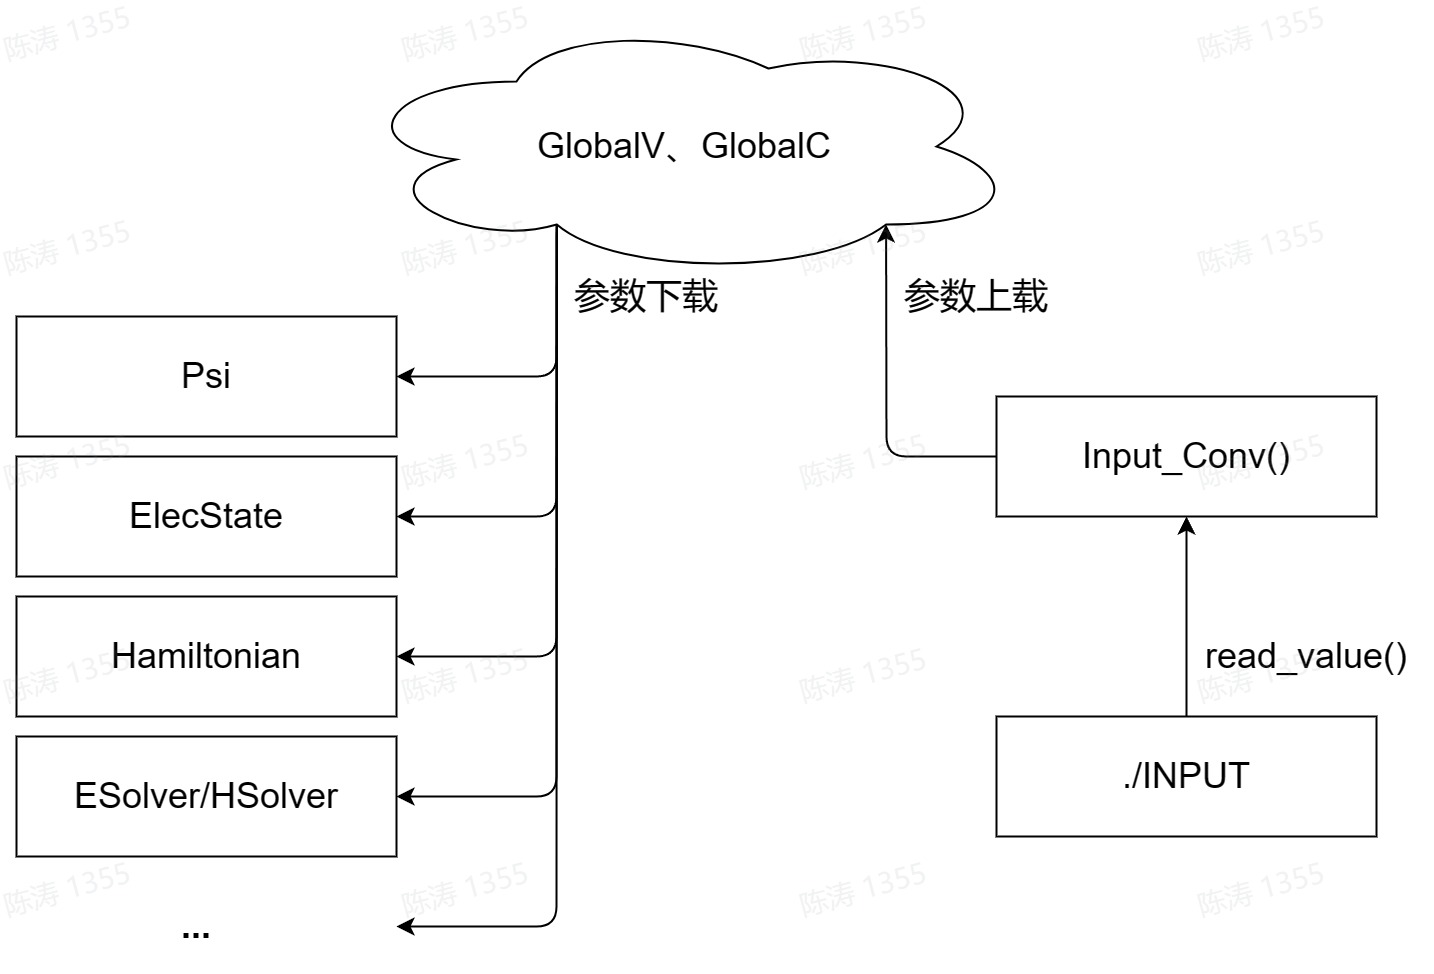
这个函数实现了从 Input 类对象的数据成员到 GlobalV 和 GlobalC 等全局变量集合的转换。相当于从 Input 到 GlobalV 和 GlobalC,以及其他直接的类的参数上载:
其他内容见 ABACUS 第一版开发手册(02. IO 模块,目前暂为飞书内部文档):
void Input_Conv::Convert(void)
{
....
    else if (INPUT.stru_file != "")
    {
        GlobalV::stru_file = INPUT.stru_file;
    }
    GlobalV::global_wannier_card = INPUT.wannier_card;
    if (INPUT.kpoint_file != "")
        GlobalV::global_kpoint_card = INPUT.kpoint_file;
....

    GlobalC::ucell.setup(INPUT.latname, INPUT.ntype, INPUT.lmaxmax, INPUT.init_vel, INPUT.fixed_axes);

    if (INPUT.calculation == "relax" || INPUT.calculation == "cell-relax")
    {
        if (INPUT.fixed_ibrav && !INPUT.relax_new)
        {
            ModuleBase::WARNING_QUIT("Input_Conv", "fixed_ibrav only available for relax_new = 1");
        }
....
        GlobalV::fixed_atoms = INPUT.fixed_atoms;
    }

    for(int i=0;i<3;i++)
    {
        GlobalV::KSPACING[i] = INPUT.kspacing[i];
    }
    GlobalV::MIN_DIST_COEF = INPUT.min_dist_coef;
....
    GlobalV::device_flag = psi::device::get_device_flag(INPUT.device, INPUT.ks_solver, INPUT.basis_type);

    if (GlobalV::device_flag == "gpu")
    {
        GlobalV::KPAR = psi::device::get_device_kpar(INPUT.kpar);
    }
    else
    {
        GlobalV::KPAR = INPUT.kpar;
        GlobalV::NSTOGROUP = INPUT.bndpar;
    }
    GlobalV::precision_flag = INPUT.precision;
...
    BFGS_Basic::relax_bfgs_w1 = INPUT.relax_bfgs_w1;
...
    Ions_Move_Basic::relax_bfgs_rmax = INPUT.relax_bfgs_rmax;
...
    Lattice_Change_Basic::fixed_axes = INPUT.fixed_axes;
...
    Ions_Move_CG::RELAX_CG_THR = INPUT.relax_cg_thr; // pengfei add 2013-09-09
...
    ModuleSymmetry::Symmetry::symm_flag = std::stoi(INPUT.symmetry);
....
    elecstate::Efield::efield_dir = INPUT.efield_dir;
....
}
🔧重构思考 对模拟体系的完全与分层次描述,是每个模拟软件包的核心设计要求。INPUT 的数据成员不仅录入到
GlobalV,GlobalC,还录入到BFGS_Basic,Ions_Move_Basic等类中,或许部分扰乱了这种层级。
winput
📝开发者旁注 本部分内容已经过时,在未来发行版中将会完全弃用
void Driver::reading(void)
{
    INPUT.Init(GlobalV::global_in_card);
    Input_Conv::Convert();
    ....
    winput::Init(GlobalV::global_wannier_card); // <- we arrive here
    ....
接下来来到 Wannier 函数计算部分,调用 Init()函数,传入参数为 wannier 文件的具体路径(winput 相关的这部分功能目前已经基本不使用,相关读入参数都在 INPUT 里面实现,后续版本会把这部分代码删除)。
在 Input::Default() 中,该量被设置为 "none",在 Input::Read() 中,该量对应于关键词 wannier_card 被读入。实际上,一般将 wannier_card 赋值为 INPUTw。
winput::Init()
void winput::Init(const std::string &fn)
{
    Default();
    Read(fn);
    Check();

#ifdef __MPI
    Bcast();
#endif
}
winput::Default()
wannier_card 部分同样具有 Default() 函数,
void winput::Default()
{
    //========================
    //  part1 : control
    //========================
    target          = "test";
    wlmr_dir    = "./";
    rcut            = 10;
    before_iter     = false;
    after_iter      = false;
    begin_stop_flag = false;
    end_flag        = false;
...
}
其中各变量均为 winput 中数据成员,类型附加 static 关键词。
winput::Read()
🔧重构思考 此处仍然使用
if(strcmp())方法读入输入文件中参数
void winput::Read(const std::string &fn)
{
    if(GlobalV::MY_RANK!=0) return;

    std::ifstream ifs(fn.c_str(), std::ios::in);
    ifs.clear(); ifs.seekg(0);

    char word[80];
....

    while (ifs.good())
    {
        ifs >> word;
        for(auto &i : word)
        {
            i = tolower(i);
        }
        //parameters for <ESP.wannier> users

        if (strcmp("target",         word) == 0)       {read_value(ifs, target);}
        else if (strcmp("trial",         word) == 0)       {read_value(ifs, trial);}
...
winput::check() 则同样地,进行一些检查。
变量分发举例:winput::Bcast()和 Input::Bcast()
和 Input 一样,winput::Bcast() 对读入所有参数进行节点间广播:
#include "module_base/parallel_common.h"
#ifdef __MPI
void winput::Bcast(void)
{
    Parallel_Common::bcast_string( target );
    Parallel_Common::bcast_bool( before_iter );
...
    Parallel_Common::bcast_double( rcut );
...
    Parallel_Common::bcast_string( wlmr_dir );
...
    Parallel_Common::bcast_int( imp_pao );
...
同理在 Input::Bcast() 中:
#ifdef __MPI
void Input::Bcast()
{
    Parallel_Common::bcast_string(suffix);
    Parallel_Common::bcast_string(stru_file); // xiaohui modify 2015-02-01
    Parallel_Common::bcast_string(pseudo_dir);
    // Parallel_Common::bcast_string(pseudo_type); // mohan add 2013-05-20 (xiaohui add 2013-06-23)
    Parallel_Common::bcast_string(orbital_dir);
    Parallel_Common::bcast_string(kpoint_file); // xiaohui modify 2015-02-01
    Parallel_Common::bcast_string(wannier_card);
...
Prallel_Common 属于 module_base 中 parallel_common.h 中声明的自建命名空间,其声明大致如下:
namespace Parallel_Common
{
    void bcast_complex_double( std::complex<double> *object, const int n);
...
    void bcast_complex_double( std::complex<double> &object);
...
}
举例其中 Prallel_Common::bcast_int():
void Parallel_Common::bcast_int(int &object)
{
    MPI_Bcast(&object, 1, MPI_INT, 0, MPI_COMM_WORLD);
}
其中 MPI_Bcast() 为 MPI 内部函数,其参数表中分别传入了需广播数据的内存地址、、数据类型,以及。
▶ 离开 winput,回到 source/driver.cpp Driver::reading(),只剩下如下内容:
std::stringstream ss1;
    ss1 << GlobalV::global_out_dir << GlobalV::global_in_card;
    INPUT.Print(ss1.str());
Driver::atomic_world()
Driver::atomic_world() 函数中执行的内容其实只有 Driver::driver_run() 函数:
void Driver::atomic_world(void)
{
    this->driver_run();
}
不要忘记我们已经完成 Driver::reading() 函数内容,到达 Driver::atomic_world()。这一点从本文档设置的分级目录中也可以看得到。
void Driver::init()
{
    this->reading();
    this->atomic_world(); // <- here!
    INPUT.close_log();
}
Driver::driver_run()
esolver
ESolver 是 ABACUS 内部工作流的驱动,根据当前模拟任务所属阶段,按顺序调用各个所需模块,
📝开发者旁注 原则上讲,
ESolver不应当含有Device和FPTYPE模板参数,未来将会被舍弃
Driver::driver_run() 定义在 source/driver.cpp 文件中,是实际驱动 ABACUS 各模块的驱动(driver)。首先创建 ESolver 类指针,并利用 ModuleESolver::init_esolver() 将其初始化:
void Driver::driver_run()
{
    ModuleESolver::ESolver *p_esolver = nullptr;
    ModuleESolver::init_esolver(p_esolver);
...
ModuleESolver::init_esolver()
我们目前只关注 pw 基的方法,首先调用 ModuleESolver::determine_type() 函数,读取具体在 INPUT 中定义的计算类型(GlobalV::ESOLVER_TYPE 和 GlobalV::BASIS_TYPE):
void init_esolver(ESolver*& p_esolver)
    {
        std::string esolver_type = determine_type();
作为回溯,GlobalV::ESOLVER 和 GlobalV::BASIS_TYPE 的赋值在 module_io/input_conv.cpp:
GlobalV::BASIS_TYPE = INPUT.basis_type; // line 320
GlobalV::ESOLVER_TYPE = INPUT.esolver_type; // line 273
其在 INPUT 中关键词为(module_io/input.cpp):
else if (strcmp("basis_type", word) == 0) //line 843
        {
            read_value(ifs, basis_type);
...
         else if (strcmp("esolver_type", word) == 0)// line 685
        {
            read_value(ifs, esolver_type);
        }
...
ModuleESolver::determine_type()
接下来根据 basis_type 和 esolver_type 两关键词对 esolver_type 进行赋值(❗ 此处已经出现 esolver 一词多义,在 ModuleESolver 域中实际上是 [能量计算方法]_[基组](_[任务类型]) 的合并):
std::string determine_type()
    {
        std::string esolver_type = "none";
        if (GlobalV::BASIS_TYPE == "pw")
        {
            if(GlobalV::ESOLVER_TYPE == "sdft") esolver_type = "sdft_pw";
            else if(GlobalV::ESOLVER_TYPE == "ofdft") esolver_type = "ofdft";
            else if(GlobalV::ESOLVER_TYPE == "ksdft") esolver_type = "ksdft_pw";
        }
        else if (GlobalV::BASIS_TYPE == "lcao_in_pw")
        {
#ifdef __LCAO
            if(GlobalV::ESOLVER_TYPE == "sdft") esolver_type = "sdft_pw";
            else if(GlobalV::ESOLVER_TYPE == "ksdft") esolver_type = "ksdft_pw";
#endif
        }
        else if (GlobalV::BASIS_TYPE == "lcao")
        {
#ifdef __LCAO
            if(GlobalV::ESOLVER_TYPE == "tddft") esolver_type = "ksdft_lcao_tddft";
            else if(GlobalV::ESOLVER_TYPE == "ksdft") esolver_type = "ksdft_lcao";
#endif
        }
        else
        {
            if(GlobalV::ESOLVER_TYPE == "lj") esolver_type = "lj_pot";
            else if(GlobalV::ESOLVER_TYPE == "dp") esolver_type = "dp_pot";
            else if(esolver_type == "none")
            {
                ModuleBase::WARNING_QUIT("ESolver", "No such esolver_type combined with basis_type");
            }
        }
        return esolver_type;
    }
得到 esolver_type,返回 ModuleESolver::init_esolver(),之后根据其由 esolver_type 定义的不同内容,为创建的 p_esolver 指定对应类型的内存空间,此时注意到各类 ESolver_* 实际上都是对 ModuleESolver::ESolver 父类的继承,而 p_esolver 为父类指针:
if (esolver_type == "ksdft_pw")
        {
        #if ((defined __CUDA) || (defined __ROCM))
            if (GlobalV::device_flag == "gpu") {
                if (GlobalV::precision_flag == "single") p_esolver = new ESolver_KS_PW<float, psi::DEVICE_GPU>();
                else p_esolver = new ESolver_KS_PW<double, psi::DEVICE_GPU>();
                return;
            }
        #endif
            if (GlobalV::precision_flag == "single") p_esolver = new ESolver_KS_PW<float, psi::DEVICE_CPU>();
            else p_esolver = new ESolver_KS_PW<double, psi::DEVICE_CPU>();
        }
#ifdef __LCAO
        else if (esolver_type == "ksdft_lcao") p_esolver = new ESolver_KS_LCAO();
        else if (esolver_type == "ksdft_lcao_tddft") p_esolver = new ESolver_KS_LCAO_TDDFT();
#endif
        else if (esolver_type == "sdft_pw") p_esolver = new ESolver_SDFT_PW();
        else if (esolver_type == "ofdft") p_esolver = new ESolver_OF();
        else if (esolver_type == "lj_pot") p_esolver = new ESolver_LJ();
        else if (esolver_type == "dp_pot") p_esolver = new ESolver_DP(INPUT.mdp.pot_file);
    }
各种 esolver 的继承关系如下所示。例如 ESolver_KS_PW 和 ESolver_KS_LCAO,均公有继承自 ESolver_KS:
// module_solver/esolver_ks_pw.h
namespace ModuleESolver
{
    template<typename FPTYPE, typename Device = psi::DEVICE_CPU>
    class ESolver_KS_PW : public ESolver_KS<FPTYPE, Device>
// module_esolver/esolver_ks_lcao.h
namespace ModuleESolver
{
    class ESolver_KS_LCAO : public ESolver_KS<double>
ESolver_KS 则公有继承自 ESolver_FP:
// module_solver/esolver_ks.h
namespace ModuleESolver
{
    template<typename FPTYPE, typename Device = psi::DEVICE_CPU>
    class ESolver_KS : public ESolver_FP
ESolver_FP 公有继承自 ESolver:
// module_solver/esolver_fp.h
namespace ModuleESolver
{
    class ESolver_FP : public ESolver
而 p_esolver 为 ModuleESolver::ESolver 类指针,自然可以如此赋值。其他关于各种 ESolver 的层级关系,可见第一版开发者手册的 09. ESolver 模块 (目前暂为飞书内部文档) 。接下来我们假设 esolver_type == "ksdft_pw",则我们需要关注前面已经展示过的(module_esolver/esolver.cpp ModuleESolver::init_esolver(): line 93):
if (esolver_type == "ksdft_pw")
        {
        #if ((defined __CUDA) || (defined __ROCM))
            if (GlobalV::device_flag == "gpu") {
                if (GlobalV::precision_flag == "single") {
                    p_esolver = new ESolver_KS_PW<float, psi::DEVICE_GPU>();
                }
                else {
                    p_esolver = new ESolver_KS_PW<double, psi::DEVICE_GPU>();
                }
                return;
            }
        #endif
            if (GlobalV::precision_flag == "single") {
                p_esolver = new ESolver_KS_PW<float, psi::DEVICE_CPU>();
            }
            else {
                p_esolver = new ESolver_KS_PW<double, psi::DEVICE_CPU>();
            }
        }
我们首先只关注 p_esolver = new ESolver_KS_PW<double, psi::DEVICE_CPU>();,即精度为浮点双精度,使用 cpu 为计算设备的情况。
不难发现,关于 ESolver_KS_PW 类的具体实现,同时使用数据类型和设备作为模板:
namespace ModuleESolver
{
    template <typename FPTYPE, typename Device>
    ESolver_KS_PW<FPTYPE, Device>::ESolver_KS_PW()
    {
        this->classname = "ESolver_KS_PW";
        this->basisname = "PW";
        this->device = psi::device::get_device_type<Device>(this->ctx);
        #if ((defined __CUDA) || (defined __ROCM))
            if (this->device == psi::GpuDevice)
            {
                hsolver::createBLAShandle();
                hsolver::createCUSOLVERhandle();
            }
        #endif
    }
其代入的设备类型 psi::DEVICE_CPU,是 psi 命名空间的变量。
至此,ModuleESolver::init_esolver() 退出,p_esolver 有值 &ESolver_KS_PW<double, psi::DEVICE_CPU>(),来到设置模拟体系的结构部分。
附录
配置便捷高效 Vscode C++ 工作环境(Windows)
在大型程序的代码阅读过程中,往往遇到变量和函数数量大,源文件、头文件不计其数的情况。因此高效、快速寻找当前感兴趣变量/函数/类/命名空间的上下游就十分重要。Vscode 是由 Microsoft 开发的集成开发环境,具有轻量、灵活、功能健全、插件开发者活跃、程序迭代较快等优点,因此推荐 Vscode 作为 ABACUS 的编辑器。
Vscode
下载链接:Download Visual Studio Code - Mac, Linux, Windows
在选择“是否把 vscode 添加到 PATH 环境变量”时,如无特殊需求,建议选择“是”,同时在选择“是否将 vscode 添加到右键菜单”时,选择“是”。
相关资料:新人教程文档(目前暂为飞书内部文档)
Vscode C++ 插件
配置完成 Vscode 后,在其扩展商店搜索“C/C++”,即可顺利一并安装三个插件,用于 C++ 程序的开发工作。

Mingw64 GNU compilers
为了让 C++ 开发环境变得更加智能,需要联合编译器,让编译器寻找变量、函数、类、命名空间等之间跨文件的引用关系。为了实现这一点,见 Microsoft Vscode 关于 C++ 编译器的官方配置教程:
Get Started with C++ and Mingw-w64 in Visual Studio Code
之后在 vscode setting.json 添加 “C_Cpp.default.compilerPath” 值,且可选 "C_Cpp.default.cppStandard" 值,对于 ABACUS,通常选择 "c++11" 或 "c++14"。
Mingw64 fftw3, mpi and googletest libraries
为了能够尽可能多避免 vscode 浏览 ABACUS 代码过程中报错,可以选择安装发行在 msys2 系列平台上的 fftw3 和 msmpi 库:
fftw3: https://packages.msys2.org/package/mingw-w64-i686-fftw?repo=mingw32
msmpi: https://packages.msys2.org/package/mingw-w64-x86_64-msmpi
Googletest: https://packages.msys2.org/base/mingw-w64-googletest
其他常见的库也可以在 https://packages.msys2.org/进行搜索后,复制命令在 msys2 prompt 进行下载安装
CMake
ABACUS 使用 CMake 便捷编译,因此也可以在本地配置 CMake。
下载、安装 CMake:Download | CMake
将安装好的 CMake 一并放入 PATH 环境变量,之后在 Vscode setting.json 中添加 “cmake.generator”,以及 "cmake.cmakePath" 值,设置 "cmake.additionalCompilerSearchDirs"。
将本地 Vscode 连通 Bohrium 平台进行高效编译开发
Bohrium 平台提供在线云计算服务,对于 ABACUS 开发工作,可以在其服务器上进行软件编译。
Bohrium 网站:
之后请 follow 单元测试环境搭建教程:新人教程文档 (目前暂为飞书内部文档)
变量、函数、类的声明、定义、调用快捷跳转
对准想要查看其声明、定义和调用(引用)的量,点击鼠标右键:
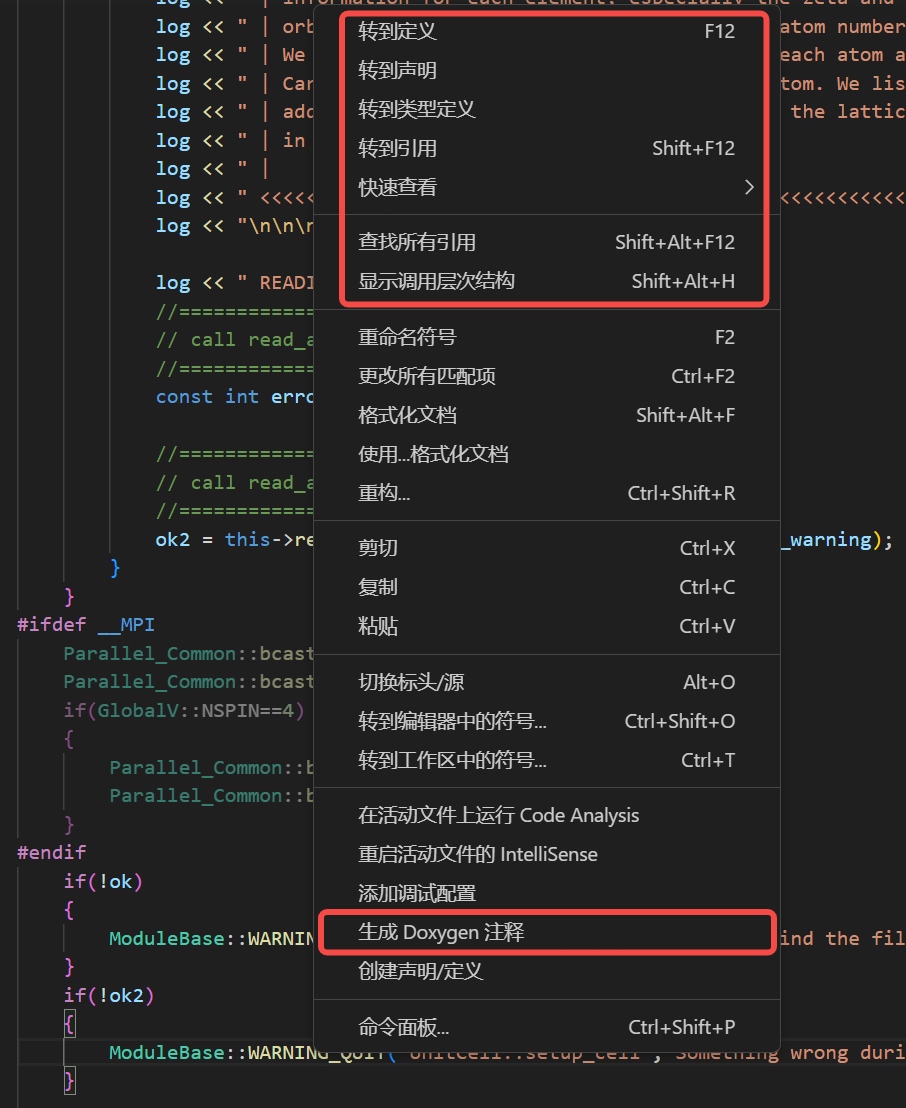
若跳转到声明(.h 文件),发现其声明旁未添加注释,或注释并非 Doxygen 格式,可以在 Vscode 扩展应用商店下载 Doxygen 插件后,发现菜单出现“生成 Doxygen 注释”,将注释内容复写为 Doxygen 格式。
相关材料:自动文档 Doxygen 使用说明 (目前暂为飞书内部文档)
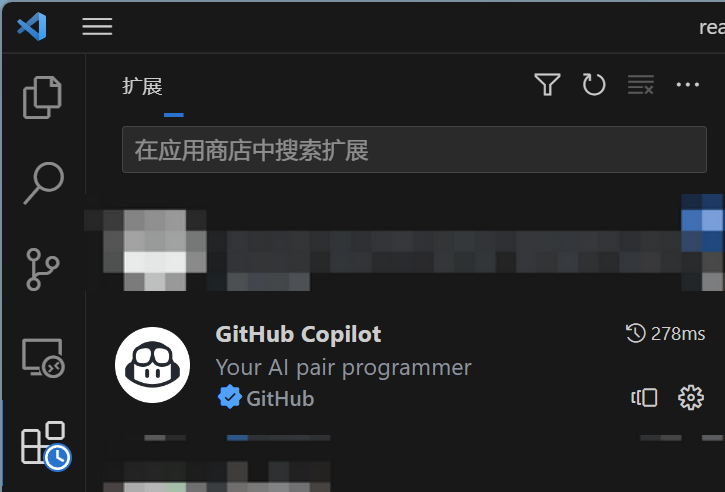
给你的开发加点魔法:Github.copilot vscode 部署
首先进行 Github 学生认证:https://education.github.com/pack
然后在 vscode 上 Extension 界面下载 Github copilot 插件。vscode 通过最下角 Github 账号登录来验证 Github.copilot 的使用权限(完成学生认证后自动拥有 Github.copilot 的使用权限)。
系列链接
上篇:从 SIAB 到 ABACUS(一):准备工作(施工中 🚧)